Scrapbook News and Review Magazine is hosting 7 days of artsy fun in our newsletter. Today is the 2nd day and mine was featured and here you go.
Hearts Forever Arch
By Lucy Chesna

Hearts Forver by Lucy Chesna Supplies Pearls: Recollections; Butterfly; Recollections; Stamp: Queen Kat; Ink: Ranger; Gel: Golden; Other: Sewing pattern tissue, flower, fabric tape, image from internet, chipboard, muslin
Supplies
Arch
Background stamp
Sewing pattern tissue
Gel medium
Sponge brush
Vintage picture
Distress Inks- Antique and Black Soot
Scissors
Embellishments
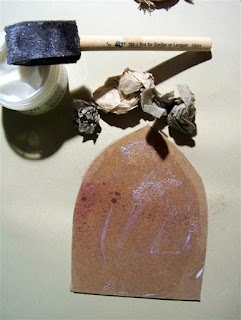 Step One: Brush a good amount of gel medium and crumble up the sewing pattern tissues (about 3 pieces)
 Step Two: Brush on 1st layer, add more gel medium and continue till all 3 pieces are on top of each other
 Step Three: Trim off all around and sand the edges; Let it dry
 Step Four: Ink the edges with Antique distress ink and then stamp the background imge with Black Soot distress ink; Let it dry
 Step Five: Trim down the image and add some gell medium in the back then brush it on the arch; Let it dry
Step Six: You are ready to embellish
Arch Template from Roni Johnson

Hearts Forever Arch
By Lucy Chesna

Hearts Forver by Lucy Chesna Supplies Pearls: Recollections; Butterfly; Recollections; Stamp: Queen Kat; Ink: Ranger; Gel: Golden; Other: Sewing pattern tissue, flower, fabric tape, image from internet, chipboard, muslin
Supplies
Arch
Background stamp
Sewing pattern tissue
Gel medium
Sponge brush
Vintage picture
Distress Inks- Antique and Black Soot
Scissors
Embellishments


Step Six: You are ready to embellish
Arch Template from Roni Johnson

Comments
Majo